How to Repair a Broken Tile Without Replacing It
Make minor repairs now, before they become major problems.
Ceramic tile. It's functional, durable and beautiful. But after a while, your tile floors, walls or counter-tops probably don't look as nice as they did when they were new. Some of the tiles may be cracked, broken or even missing.
So, what can you do to recreate that like-new look? You could rip it all out and start over with new tile, but that's expensive.
For an easier and much less expensive alternative, follow this ceramic tile repair guide to find out how to deal with those tile hassles and headaches.
Problems, Products, And People
Ceramic tile can fail on any of three fronts: the tile, the grout or the caulk. You'll learn the most common repairs and what materials and tools you'll need.
The best place to buy tools and materials is at a specialty tile shop. Besides finding all of the stuff you'll need, you'll be able to talk with salespeople who handle tile repair questions every day.
If you decide your tile is too far gone to repair, read my Ceramic Tile Guide. It's loaded with information on how to plan a tile layout and install floor and wall tiles.
Giving you an exact cost for repairs is tough since tile and grout prices vary quite a bit. However, the tools should cost $40 or less.
Matching Old Tiles
One of the toughest ceramic tile problems is trying to match the existing tiles. Tile colors change as often as the color trends in wallpaper and paint. Tile sizes change too, with tile thickness being a frequent culprit. The odds are you won't find an exact match.
But don't despair. There are options.
You can replace a few tiles and create a new pattern, which will give the room a whole new look.
Another alternative is to borrow a good tile from an inconspicuous place, such as behind the toilet or the sink cabinet.
If you decide to try this, you should know that you'll be trying to remove a tile that's usually firmly attached to the wall. Removing a tile without damaging it is often difficult and sometimes impossible.
Tile Problems
Ceramic tiles can break, come loose or chip. You can replace broken ones and resecure a loose tile, but there's no good fix for nicks and chips. Let's start with the most involved repair — a broken tile.
Replacing a Broken Tile
Whether the broken tile is on the floor (like mine) or on the wall, the steps for replacing it are similar.
The first thing to do is remove the damaged tile. If it's loose, which it often is, you should be able to pry it up with a screwdriver.
If not, break the tile into smaller pieces using a hammer and cold chisel (Photo 1).

Remove the damaged tile with a hammer and cold chisel. Ceramic tile is brittle — small pieces will fly. Wear eye protection! Remove the old grout too. Be careful not to chip the surrounding tiles.

Place the tip of the cold chisel at the crack or break and then hit the chisel with the hammer (photo above).
Be careful. Ceramic tile is brittle and easy to break. And when you strike it, small pieces will go flying. Wear eye protection and work gloves!
Once all of the tile is removed, you need to break out the old grout that's around it. Use the chisel and hammer to do this too, but be careful that you don't chip the good tiles.
Next, remove the old adhesive from the floor or wall with the cold chisel (Photo 2). Remove as much of the adhesive as you can, but don't worry if you leave some of it behind. Just make sure that the surface is smooth. Once the adhesive has been scraped loose, sweep or vacuum it up.
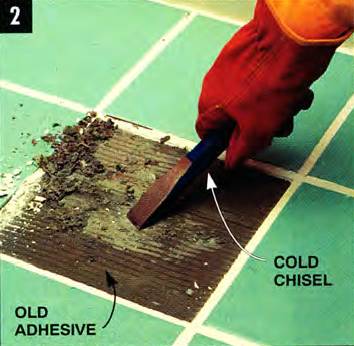
Scrape all the old adhesive with a cold chisel. Remove as much as possible so the new tile will adhere properly. Scraping is the best way to remove the adhesive.
Don't use a heat gun or solvent to soften the old adhesive. This makes the job very messy and you won't remove any more adhesive than by simply scraping.
The type of adhesive you use to secure the new tile depends on the type of tile you're replacing. For floor files, like I'm showing, use thin-set mortar. It comes in a powder that you mix with water. For wall tiles, use premixed mastic adhesive. Tile stores sell both of these products.
Apply a liberal amount of mortar to the back of the floor tile (Photo 3). Be sure to spread it out to the tile edges. Wear rubber gloves too. Mortar or mastic is tough to get off of your hands after it dries.

Apply the mortar to the back of the tile, spreading it out to the edges. If you're replacing floor tiles, use thin-set mortar; for wall tile, use pre-mixed mastic adhesive.
Set the tile in place and check the spacing between the tiles. Make sure the spacing matches up with all the other grout lines.
Once the tile is in place, use a short length of wood and a hammer to gently tap it down (Photo 4). You don't need to pound on the wood too hard — just enough to set the tile into the adhesive and to get it level with the surrounding tiles. Wipe away any excess adhesive that oozes out from under the tile.

Set the tile firmly into the mortar, level with the surrounding tiles, by placing a short length of wood on the tile and gently tapping the wood with a hammer.
Check the package label for the adhesive's drying time before moving on to the next step.
Once the adhesive is dry, regrout around the new tile. Grout also comes in powder form that you mix with water. If you're regrouting floor tiles, use a sanded grout; for wall tiles. use non-sanded grout. Again, wear rubber gloves — the lime in the grout really dries out your hands.
Matching grout color can be a little tricky, although most tile stores carry a variety of grout colors. You can also buy a grout colorant — a powder that you add to the grout before mixing it with water—to help match your grout.
Spread the grout across the tiles with a rubber grout float (Photo 5). Hold the float at a 45-degree angle. Move it in both directions to work the grout into the gaps between the tiles.
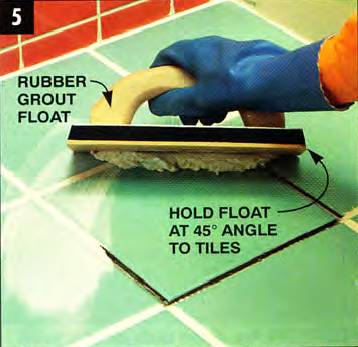
Spread the grout using a rubber gram float, holding it at a 45-degree angle to the tile. Move the grout in both directions. Use a grout that matches your existing grout.
Let the grout set for 10 to 15 minutes and then wipe the area with a damp grout sponge. A grout sponge has rounded corners that work the grout into the gaps and shape the grout lines. Once the grout has dried — again, check the package for drying time — wipe off the residue with a soft cloth.
Finally, apply a penetrating grout sealer. Penetrating sealers fill the grout pores and harden the surface, reducing the absorption of dirt and mold.
Fixing a Loose Soap Dish
Resecuring that loose tile soap dish that's been bugging you for months is no big deal. If you want to reuse the old one, you need to scrape all of the old adhesive from the back of the soap dish and the wall. However. it may be easier to just buy a new soap dish if you can find a color to match or one you like.
Some soap dishes, especially those installed in the 1980's and before, are actually part of the wall tile pattern. They're set into the adhesive like regular wall tiles and then grouted.
Most of the soap dishes sold now are designed to be mounted directly on a wall tile or tiles If your soap dish is part of the wall pattern, follow the steps described in "Replacing a Broken Tile." If the soap dish is mounted on top of a tile, do the following:
Coat the back of the soap dish, including filling the holes in the back of the dish, with 100% silicone rubber adhesive caulk (Photo 6). Use 100% silicone rubber adhesive caulk for this and the other caulk repairs. It costs a little more than latex, but it's the best.

Mount a soap dish using 100% silicone rubber adhesive caulk on the entire back of the dish. Be sure to fill the holes in the back of the dish with caulk too.
Position the soap dish on the wall and secure it with a couple of strips of heavy-duty tape — duct tape works well. Place one strip horizontally and the other vertically (Photo 7). Leave the tape in place overnight, or the soap dish could end up in the tub in the morning.

Position the soap dish on the wall and secure it with duct tape. Place one strip of tape horizontally and another vertically. Leave the tape in place overnight.
Once the soap dish is firmly attached, apply a head of the caulk where the soap dish meets the wall tile.
Chipped Tiles
A chipped tile doesn't cause any structural problems. It's only an eyesore. Unfortunately, there's really no surefire way to repair chips.
The best Band-Aid fix is to try to find an acrylic paint or permanent marker that matches the tile color and use it to coat the chipped area.
Grout Problems
Most grout problems require you to do one of two things: If the grout is cracked, loose, or missing, you should replace it. If it's discolored, you need to clean it.
Replacing Grout
Removing grout can be a piece of cake or a nasty job. And you won't know which category yours is going to be in until you start. Removing loose, cracked or broken grout is a slow, hard job, and you must be thorough to get good results.
The simplest way to remove bad grout is with a grout saw (Photo 8). A professional-style saw has two blades that work together: One blade has conventional-looking saw teeth to break up and rake out the grout; the other blade has a rough, almost sandpaper-like edge to clean out any remaining grout and to smooth rough spots along the edge of the tile.
Move the grout saw back and forth — as if you were sawing wood — to loosen and clean out the grout. Be particularly careful not to nick or chip the tile edges.

Remove the old grout with a grout saw. The professional-style saw uses two different types of blades to break up and remove the grout. Be careful not to nick or chip the tiles when sawing.

Remove any grout that's loose or cracked. A solid grout line doesn't need to be removed.
You can also avoid the manual labor and buy yourself an oscillating grout removal blade, and remove grout with your oscillating multi-tool. Al the tips above work the same, the only difference is that you'll make the same chore in much less time.

The DWA4220 by Dewalt has a universal fitment which is compatible with all major tool brands. Click here to buy it from Amazon.
Once the grout is out, clean the surface thoroughly with a solution of phosphoric acid (available at the tile store) and water (Photo 9). Phosphoric acid sounds tough and it is. But it's really not hard on your hands, especially when it's diluted with water. If you have sensitive skin, though, wear rubber gloves. Also, if your shower has a glass door, don't let the solution get on the glass. It will etch the glass.

Clean the surface with a solution of phosphoric acid and water. If you have sensitive skin, wear rubber gloves. Don't let the solution get on a glass shower door — it will etch the glass!
Regrout the tiles after the surface has dried. Again, try to match the grout color as closely as possible to make the repair less visible.
Mix the grout according to the package instructions and then apply it using a rubber grout float (Photo 10). Hold the float at a 45-degree angle to the wall and spread the grout across the tiles. Move the grout in both directions. Be sure to apply sufficient pressure to force the grout into the gaps.

Spread the grout using a rubber grout float. Hold the float at a 45-degree angle to the wall and move it in both directions to spread the grout. Use a non-sanded grout for wall tiles.
After the grout has set for about 30 minutes, wipe the area with a dampened grout sponge to shape the new grout lines to match the existing ones.
Now let the grout dry for an additional hour, and then wipe the tiles and grout with a soft cloth to remove any residue.
After the grout has dried completely (usually within 24 to 48 hours, but check the package for specific times), apply a penetrating sealer to both the grout and the tiles (Photo 11).

Apply a penetrating sealer to the grout and tiles after the grout has dried. Check the grout package for drying time. Reapply penetrating sealer annually to extend the life of the grout.
Cleaning Grout
Whether it's white, gray or a trendy designer color, grout gets dirty. But there's no need to replace it if the grout is intact.
Most grout can be cleaned with the phosphoric acid and water solution described in the previous section. If the grout is really dirty, use the acid undiluted. Wear rubber gloves if you have sensitive skin, regardless of which solution you use.
The best way to scrub grout is with a nylon-bristle grout brush (Photo 12). The bristles are stiff enough so that you can scrub hard. Repeat scrubbing as needed.
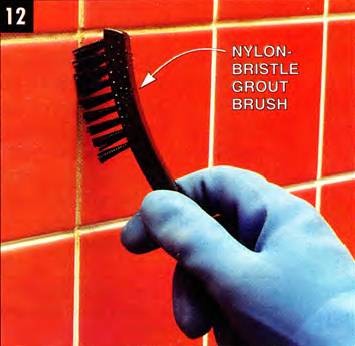
Scrub the grout with the phosphoric acid/water solution using a nylon-bristle grout brush. The long, stiff bristles let you scrub hard to remove dirt and mildew. Repeat scrubbing as needed.
Caulk Problems
Most people don't associate caulk or caulk problems with ceramic tile. But some tile joints must be flexible, yet leak-free, to ensure a long life for the tile, grout, and the subsurface. The best way to get a leak-free, flexible joint is to caulk it.
Bathtub-Tile Caulk Joint
A good caulk joint is needed where the bathtub and tile meet. If the caulk or grout is split, missing or covered with mold and mildew, clean out the area and recaulk the gap (Photo 13).
A screwdriver should do the trick, but be careful not to chip the tiles or scratch the tub surface You don't need to regrout between the tub and tile — a solid head of caulk will keep the water out.

Remove cracked or badly stained caulk and grout from the tile and tub joint. Clean the area with the acid/water solution. Apply a bead of 100% silicone rubber caulk. You don't have to regrout the gap — the caulk will seal it.
Before you apply the caulk, clean the area with the phosphoric acid solution. Dry the surface completely and then apply a bead of 100% silicone rubber adhesive caulk.
Also, apply caulk where the water handles and tub spout meet the wall tiles. This prevents water from getting behind the handles and spout and penetrating the wall where the water supply pipes come through.
Countertop/Backsplash Grout Joints
If you have a tile countertop and backsplash in your kitchen or bathroom, listen up. The joint formed where these two surfaces meet really gets abused. Every time you close a drawer or bump the countertop you jar the joint. And while these bumps may seem minor, over time they can and usually do crack the grouted joint.
Photo 14 shows a head of 100% silicone rubber adhesive caulk being applied directly over the grouted joint. The caulk helps prevent the grout from cracking whenever the countertop is bumped. If the grout joint is already cracked, remove it and regrout before applying the caulk.

Apply a bead of 100% silicone adhesive caulk over the grouted joint between the countertop and backsplash. Use clear caulk if you can't find a caulk to match the grout color.
Notice that the caulk being applied looks white — but it will dry clear. (Many clear caulks are white when they come out of the tube.) A clear caulk was used because it's very difficult to find a caulk, especially silicone rubber, to match the grout color. If you do find one to match, use it. If not, use clear.
Moisten your finger with water and then smooth out the head of caulk (Photo 15). Keep a small amount of water and a rag handy.
Dip your finger in the water frequently to keep it wet; use the rag to wipe off the excess caulk that will collect on your finger as you smooth the joint.

Dip your finger in water and then run it on the bead of caulk to smooth and shape it. Keep a small amount of water handy to keep your finger moist. As you're smoothing, wipe off the excess caulk that will collect on your finger.
Make minor repairs now, before they become major problems.
Ceramic tile. It's functional, durable and beautiful. But after a while, your tile floors, walls or counter-tops probably don't look as nice as they did when they were new. Some of the tiles may be cracked, broken or even missing.
So, what can you do to recreate that like-new look? You could rip it all out and start over with new tile, but that's expensive.
For an easier and much less expensive alternative, follow this ceramic tile repair guide to find out how to deal with those tile hassles and headaches.
Problems, Products, And People
Ceramic tile can fail on any of three fronts: the tile, the grout or the caulk. You'll learn the most common repairs and what materials and tools you'll need.
The best place to buy tools and materials is at a specialty tile shop. Besides finding all of the stuff you'll need, you'll be able to talk with salespeople who handle tile repair questions every day.
If you decide your tile is too far gone to repair, read my Ceramic Tile Guide. It's loaded with information on how to plan a tile layout and install floor and wall tiles.
Giving you an exact cost for repairs is tough since tile and grout prices vary quite a bit. However, the tools should cost $40 or less.
Matching Old Tiles
One of the toughest ceramic tile problems is trying to match the existing tiles. Tile colors change as often as the color trends in wallpaper and paint. Tile sizes change too, with tile thickness being a frequent culprit. The odds are you won't find an exact match.
But don't despair. There are options.
You can replace a few tiles and create a new pattern, which will give the room a whole new look.
Another alternative is to borrow a good tile from an inconspicuous place, such as behind the toilet or the sink cabinet.
If you decide to try this, you should know that you'll be trying to remove a tile that's usually firmly attached to the wall. Removing a tile without damaging it is often difficult and sometimes impossible.
Tile Problems
Ceramic tiles can break, come loose or chip. You can replace broken ones and resecure a loose tile, but there's no good fix for nicks and chips. Let's start with the most involved repair — a broken tile.
Replacing a Broken Tile
Whether the broken tile is on the floor (like mine) or on the wall, the steps for replacing it are similar.
The first thing to do is remove the damaged tile. If it's loose, which it often is, you should be able to pry it up with a screwdriver.
If not, break the tile into smaller pieces using a hammer and cold chisel (Photo 1).
Remove the damaged tile with a hammer and cold chisel. Ceramic tile is brittle — small pieces will fly. Wear eye protection! Remove the old grout too. Be careful not to chip the surrounding tiles.
Place the tip of the cold chisel at the crack or break and then hit the chisel with the hammer (photo above).
Be careful. Ceramic tile is brittle and easy to break. And when you strike it, small pieces will go flying. Wear eye protection and work gloves!
Once all of the tile is removed, you need to break out the old grout that's around it. Use the chisel and hammer to do this too, but be careful that you don't chip the good tiles.
Next, remove the old adhesive from the floor or wall with the cold chisel (Photo 2). Remove as much of the adhesive as you can, but don't worry if you leave some of it behind. Just make sure that the surface is smooth. Once the adhesive has been scraped loose, sweep or vacuum it up.
Scrape all the old adhesive with a cold chisel. Remove as much as possible so the new tile will adhere properly. Scraping is the best way to remove the adhesive.
Don't use a heat gun or solvent to soften the old adhesive. This makes the job very messy and you won't remove any more adhesive than by simply scraping.
The type of adhesive you use to secure the new tile depends on the type of tile you're replacing. For floor files, like I'm showing, use thin-set mortar. It comes in a powder that you mix with water. For wall tiles, use premixed mastic adhesive. Tile stores sell both of these products.
Apply a liberal amount of mortar to the back of the floor tile (Photo 3). Be sure to spread it out to the tile edges. Wear rubber gloves too. Mortar or mastic is tough to get off of your hands after it dries.
Apply the mortar to the back of the tile, spreading it out to the edges. If you're replacing floor tiles, use thin-set mortar; for wall tile, use pre-mixed mastic adhesive.
Set the tile in place and check the spacing between the tiles. Make sure the spacing matches up with all the other grout lines.
Once the tile is in place, use a short length of wood and a hammer to gently tap it down (Photo 4). You don't need to pound on the wood too hard — just enough to set the tile into the adhesive and to get it level with the surrounding tiles. Wipe away any excess adhesive that oozes out from under the tile.
Set the tile firmly into the mortar, level with the surrounding tiles, by placing a short length of wood on the tile and gently tapping the wood with a hammer.
Check the package label for the adhesive's drying time before moving on to the next step.
Once the adhesive is dry, regrout around the new tile. Grout also comes in powder form that you mix with water. If you're regrouting floor tiles, use a sanded grout; for wall tiles. use non-sanded grout. Again, wear rubber gloves — the lime in the grout really dries out your hands.
Matching grout color can be a little tricky, although most tile stores carry a variety of grout colors. You can also buy a grout colorant — a powder that you add to the grout before mixing it with water—to help match your grout.
Spread the grout across the tiles with a rubber grout float (Photo 5). Hold the float at a 45-degree angle. Move it in both directions to work the grout into the gaps between the tiles.
Spread the grout using a rubber gram float, holding it at a 45-degree angle to the tile. Move the grout in both directions. Use a grout that matches your existing grout.
Let the grout set for 10 to 15 minutes and then wipe the area with a damp grout sponge. A grout sponge has rounded corners that work the grout into the gaps and shape the grout lines. Once the grout has dried — again, check the package for drying time — wipe off the residue with a soft cloth.
Finally, apply a penetrating grout sealer. Penetrating sealers fill the grout pores and harden the surface, reducing the absorption of dirt and mold.
Fixing a Loose Soap Dish
Resecuring that loose tile soap dish that's been bugging you for months is no big deal. If you want to reuse the old one, you need to scrape all of the old adhesive from the back of the soap dish and the wall. However. it may be easier to just buy a new soap dish if you can find a color to match or one you like.
Some soap dishes, especially those installed in the 1980's and before, are actually part of the wall tile pattern. They're set into the adhesive like regular wall tiles and then grouted.
Most of the soap dishes sold now are designed to be mounted directly on a wall tile or tiles If your soap dish is part of the wall pattern, follow the steps described in "Replacing a Broken Tile." If the soap dish is mounted on top of a tile, do the following:
Coat the back of the soap dish, including filling the holes in the back of the dish, with 100% silicone rubber adhesive caulk (Photo 6). Use 100% silicone rubber adhesive caulk for this and the other caulk repairs. It costs a little more than latex, but it's the best.
Mount a soap dish using 100% silicone rubber adhesive caulk on the entire back of the dish. Be sure to fill the holes in the back of the dish with caulk too.
Position the soap dish on the wall and secure it with a couple of strips of heavy-duty tape — duct tape works well. Place one strip horizontally and the other vertically (Photo 7). Leave the tape in place overnight, or the soap dish could end up in the tub in the morning.
Position the soap dish on the wall and secure it with duct tape. Place one strip of tape horizontally and another vertically. Leave the tape in place overnight.
Once the soap dish is firmly attached, apply a head of the caulk where the soap dish meets the wall tile.
Chipped Tiles
A chipped tile doesn't cause any structural problems. It's only an eyesore. Unfortunately, there's really no surefire way to repair chips.
The best Band-Aid fix is to try to find an acrylic paint or permanent marker that matches the tile color and use it to coat the chipped area.
Grout Problems
Most grout problems require you to do one of two things: If the grout is cracked, loose, or missing, you should replace it. If it's discolored, you need to clean it.
Replacing Grout
Removing grout can be a piece of cake or a nasty job. And you won't know which category yours is going to be in until you start. Removing loose, cracked or broken grout is a slow, hard job, and you must be thorough to get good results.
The simplest way to remove bad grout is with a grout saw (Photo 8). A professional-style saw has two blades that work together: One blade has conventional-looking saw teeth to break up and rake out the grout; the other blade has a rough, almost sandpaper-like edge to clean out any remaining grout and to smooth rough spots along the edge of the tile.
Move the grout saw back and forth — as if you were sawing wood — to loosen and clean out the grout. Be particularly careful not to nick or chip the tile edges.
Remove the old grout with a grout saw. The professional-style saw uses two different types of blades to break up and remove the grout. Be careful not to nick or chip the tiles when sawing.
Remove any grout that's loose or cracked. A solid grout line doesn't need to be removed.
You can also avoid the manual labor and buy yourself an oscillating grout removal blade, and remove grout with your oscillating multi-tool. Al the tips above work the same, the only difference is that you'll make the same chore in much less time.
The DWA4220 by Dewalt has a universal fitment which is compatible with all major tool brands. Click here to buy it from Amazon.
Once the grout is out, clean the surface thoroughly with a solution of phosphoric acid (available at the tile store) and water (Photo 9). Phosphoric acid sounds tough and it is. But it's really not hard on your hands, especially when it's diluted with water. If you have sensitive skin, though, wear rubber gloves. Also, if your shower has a glass door, don't let the solution get on the glass. It will etch the glass.
Clean the surface with a solution of phosphoric acid and water. If you have sensitive skin, wear rubber gloves. Don't let the solution get on a glass shower door — it will etch the glass!
Regrout the tiles after the surface has dried. Again, try to match the grout color as closely as possible to make the repair less visible.
Mix the grout according to the package instructions and then apply it using a rubber grout float (Photo 10). Hold the float at a 45-degree angle to the wall and spread the grout across the tiles. Move the grout in both directions. Be sure to apply sufficient pressure to force the grout into the gaps.
Spread the grout using a rubber grout float. Hold the float at a 45-degree angle to the wall and move it in both directions to spread the grout. Use a non-sanded grout for wall tiles.
After the grout has set for about 30 minutes, wipe the area with a dampened grout sponge to shape the new grout lines to match the existing ones.
Now let the grout dry for an additional hour, and then wipe the tiles and grout with a soft cloth to remove any residue.
After the grout has dried completely (usually within 24 to 48 hours, but check the package for specific times), apply a penetrating sealer to both the grout and the tiles (Photo 11).
Apply a penetrating sealer to the grout and tiles after the grout has dried. Check the grout package for drying time. Reapply penetrating sealer annually to extend the life of the grout.
Cleaning Grout
Whether it's white, gray or a trendy designer color, grout gets dirty. But there's no need to replace it if the grout is intact.
Most grout can be cleaned with the phosphoric acid and water solution described in the previous section. If the grout is really dirty, use the acid undiluted. Wear rubber gloves if you have sensitive skin, regardless of which solution you use.
The best way to scrub grout is with a nylon-bristle grout brush (Photo 12). The bristles are stiff enough so that you can scrub hard. Repeat scrubbing as needed.
Scrub the grout with the phosphoric acid/water solution using a nylon-bristle grout brush. The long, stiff bristles let you scrub hard to remove dirt and mildew. Repeat scrubbing as needed.
Caulk Problems
Most people don't associate caulk or caulk problems with ceramic tile. But some tile joints must be flexible, yet leak-free, to ensure a long life for the tile, grout, and the subsurface. The best way to get a leak-free, flexible joint is to caulk it.
Bathtub-Tile Caulk Joint
A good caulk joint is needed where the bathtub and tile meet. If the caulk or grout is split, missing or covered with mold and mildew, clean out the area and recaulk the gap (Photo 13).
A screwdriver should do the trick, but be careful not to chip the tiles or scratch the tub surface You don't need to regrout between the tub and tile — a solid head of caulk will keep the water out.
Remove cracked or badly stained caulk and grout from the tile and tub joint. Clean the area with the acid/water solution. Apply a bead of 100% silicone rubber caulk. You don't have to regrout the gap — the caulk will seal it.
Before you apply the caulk, clean the area with the phosphoric acid solution. Dry the surface completely and then apply a bead of 100% silicone rubber adhesive caulk.
Also, apply caulk where the water handles and tub spout meet the wall tiles. This prevents water from getting behind the handles and spout and penetrating the wall where the water supply pipes come through.
Countertop/Backsplash Grout Joints
If you have a tile countertop and backsplash in your kitchen or bathroom, listen up. The joint formed where these two surfaces meet really gets abused. Every time you close a drawer or bump the countertop you jar the joint. And while these bumps may seem minor, over time they can and usually do crack the grouted joint.
Photo 14 shows a head of 100% silicone rubber adhesive caulk being applied directly over the grouted joint. The caulk helps prevent the grout from cracking whenever the countertop is bumped. If the grout joint is already cracked, remove it and regrout before applying the caulk.
Apply a bead of 100% silicone adhesive caulk over the grouted joint between the countertop and backsplash. Use clear caulk if you can't find a caulk to match the grout color.
Notice that the caulk being applied looks white — but it will dry clear. (Many clear caulks are white when they come out of the tube.) A clear caulk was used because it's very difficult to find a caulk, especially silicone rubber, to match the grout color. If you do find one to match, use it. If not, use clear.
Moisten your finger with water and then smooth out the head of caulk (Photo 15). Keep a small amount of water and a rag handy.
Dip your finger in the water frequently to keep it wet; use the rag to wipe off the excess caulk that will collect on your finger as you smooth the joint.
Dip your finger in water and then run it on the bead of caulk to smooth and shape it. Keep a small amount of water handy to keep your finger moist. As you're smoothing, wipe off the excess caulk that will collect on your finger.
How to Repair a Broken Tile Without Replacing It
Source: https://bestlife52.com/home/repair-ceramic-tile/
0 Response to "How to Repair a Broken Tile Without Replacing It"
Post a Comment